本文首发于《阿里巴巴终端技术》公众号

Why Hooks API?

Hooks API 从 2018 年开始进入开发者视野至今已经将近两年了,但目前还有很多同学对 Hooks 有很多的不理解和困惑。

  • 为何要从 Class API 换成 Hooks API?
  • Hooks API 使用方法跟 Class API 有很大的区别,需要重新学习。
  • 大量的函数嵌套让“闭包陷阱”变得非常常见。

我们也不难发现社区上已经有很多关于 Hooks API 的教程,甚至的其源码的分析学习。但当我们实际地到 React 的源码中学习 Hooks API 的实现方式的时候,会被其“神奇”的实现方式搞得更加一头雾水。那么我们究竟还能从什么角度去学习和理解 Hooks API 的设计模式呢?

TL;DR

本文包含以下内容:

  • Hooks API 与 Class API 的区别
  • Hooks API 中的函数式编程
  • Hooks API 与 codata/Algebra
  • React Hooks 与 Vue Composition API

YES

本文将带你用另外一种角度探索 Hooks API,帮助你对 Hooks API 有更好的理解。

NO

本文不会教导你如何使用 Hooks API,也不能直接帮助你如何更好地使用 Hooks API。

嗯,居然还想继续往下看吗?那就请不要跳过任何一句话哦,不然会严重影响阅读体验的。

函数式编程

实际上 Hooks API 的核心是函数式编程(Functional Programming)的开发模式,绝大部分的 API 表达都通过函数的形式提供。其实函数式编程在 React 这个框架中是从一开始便存在的。

View=Render(State)View=Render(State)

这个是理解 React 的 Immutable(不可修改的)开发模式的一个核心“口诀”。JSX 实际上是 React 用于将 State 转换为 Virtual DOM 的函数表达方式,开发者通过 JSX 来定义好 State -> View 中间的转换关系以后,只需通过 setState 来改变组件的状态,React 变会通过各个组件的视图表达函数(Render)对所有的 State 进行转换和组合,最终得到实际的页面结构。

State=Reducer(State,Action)State^{'}=Reducer(State, Action)

而在 React 的开发生态中,状态管理工具经过了多次迭代后,同样是以函数式编程作为核心的 Redux 成为了 React 开发社区中最流行的选择。在 Redux 的设计模式中,函数式的概念更是体现地更加彻底。Redux Store 中的 State 进行变更需要通过 Action 来触发 Reducer。而最核心的 Reducer 的基本概念就是:

1
2
3
4
5
6
7
8
9
10
11
12
13
14
15
16
17
interface State {
count: number;
}
const state: State = {
count: 0,
};

const INCR = (state: State, payload: number = 1): State => {
return {
count: state.count + payload,
};
};
const DECR = (state: State, payload: number = 1): State => {
return {
count: state.count - payload,
};
};

Redux 的状态管理实际上是通过使用不断地组合 Reducer+Action 得到的“记录”结果,我们在 Redux Devtools 中便可以看到按时间顺序执行的 Action 列表,甚至可以在 Action 队列中进行“时间穿梭”。但实际这种开发模式对不熟悉函数式编程或者数学功底比较一般的同学来说,理解成本会相对较高。

让我们回归到 Hooks API 的函数式编程本身。虽然 React 和 Redux 本身对函数式编程的模式的支持程度都很高了,为何带状态的组件还是只能以面向对象的形式开发呢?而且实际上 React 的 Class API 开发模式是建立在状态机模式之上的,组件中通过修改组件实例中的 this.state 来让组件的视图进行响应。当然这种模式从组件开发上并没有什么问题,但当出现需要对组件中的某些逻辑进行抽象并复用时,Class API 的问题就暴露出来了。

假设有一个需要抽象的计数器逻辑,在 Class API 中有两种抽象方式:Mixin 和 HOC(Higher Order Component)。

逻辑抽象方式

Mixins

是一种非常“原始”的逻辑复用方式,它通过 React.createClass 的方式将一个抽象逻辑混合到业务组件中,从而能够在组件中复用抽象逻辑。但这种模式限制非常大,而且很容易出现冲突。

1
2
3
4
5
6
7
8
9
10
11
12
13
14
15
16
17
18
19
20
21
22
23
24
25
26
27
28
29
30
31
32
33
34
35
36
37
38
39
40
41
42
43
44
import React from "react";
import ReactDOM from "react-dom";
import { Row, Col, Button } from "antd";

const counterMixin = {
getInitialState() {
return {
count: 0,
};
},

incr(increment = 1) {
this.setState({
count: this.state.count + increment,
});
},

decr(decrement = 1) {
this.setState({
count: this.state.count - decrement,
});
},
};

// Deprecated since React 15.5.0
const Counter = React.createClass({
mixins: [counterMixin],

render() {
return (
<Row style={{ width: 150, textAlign: "center" }}>
<Col span={24}>
<h3>{this.state.count}</h3>
</Col>
<Col span={12}>
<Button onClick={() => this.incr()}>INCR</Button>
</Col>
<Col span={12}>
<Button onClick={() => this.decr()}>DECR</Button>
</Col>
</Row>
);
},
});

HOC

createClass 从 React 15.5.0 版本开始就被移除了,而 HOC 这种拓展方式则相对更灵活一些。HOC 的核心逻辑是对业务组件进行包装,并将封装的逻辑通过参数的方式传给业务组件。

1
2
3
4
5
6
7
8
9
10
11
12
13
14
15
16
17
18
19
20
21
22
23
24
25
26
27
28
29
30
31
32
33
34
35
36
37
38
39
40
41
42
43
44
45
46
47
48
49
50
51
import React, { Component } from "react";
import ReactDOM from "react-dom";
import { Row, Col, Button } from "antd";

function CounterComponent(WrappedComponent) {
return class extends Component {
state = {
count: 0,
};

incr(increment = 1) {
this.setState({
count: this.state.count + increment,
});
}

decr(decrement = 1) {
this.setState({
count: this.state.count - decrement,
});
}

render() {
const countProps = {
count: this.state.count,
incr: (increment) => this.incr(increment),
decr: (decrement) => this.decr(decrement),
};

return <WrappedComponent {...this.props} {...countProps} />;
}
};
}

const Counter = CounterComponent((props) => {
const { count, incr, decr } = props;

return (
<Row style={{ width: 150, textAlign: "center" }}>
<Col span={24}>
<h3>{count}</h3>
</Col>
<Col span={12}>
<Button onClick={() => incr && incr()}>INCR</Button>
</Col>
<Col span={12}>
<Button onClick={() => decr && decr()}>DECR</Button>
</Col>
</Row>
);
});

这种方法看似简单,但如果需要在业务组件中添加状态的话就比较麻烦。如果需要传入更复杂的组件逻辑的话,则需要使用 connect 之类的方法来实现了。

那么这个需求在 Hooks API 需要怎么实现呢?

Hooks API

Hooks API 的 React 可以让原本只能充当 Stateless Component 的函数组件也具备了 Stateful 的能力,而 Hooks 本身也是通过函数来实现的。

1
2
3
4
5
6
7
8
9
10
11
12
13
14
15
16
17
18
19
20
21
22
23
24
25
26
27
28
29
30
31
32
33
34
import React, { useState } from "react";
import ReactDOM from "react-dom";
import { Row, Col, Button } from "antd";

function useCount(initCount = 0) {
const [count, setCount] = useState(initCount);

const incr = () => setCount(count + 1);
const decr = () => setCount(count - 1);

return {
count,
incr,
decr,
};
}

function Counter() {
const { count, incr, decr } = useCount();

return (
<Row style={{ width: 150, textAlign: "center" }}>
<Col span={24}>
<h3>{count}</h3>
</Col>
<Col span={12}>
<Button onClick={() => incr()}>INCR</Button>
</Col>
<Col span={12}>
<Button onClick={() => decr()}>DECR</Button>
</Col>
</Row>
);
}

嗯,看上去简单多了。但当我们像使用 Class API + Async/Await 那样对修改后的状态进行读取的时候,奇怪的事情发生了。比如我们需要在执行 incr 之后打印出新的 count,在 Class API 中只要在执行 this.setState 的时候使用 await 进行异步执行,便可以在后面的代码中取得正确的新数值。而在 Hooks API 中,哪怕使用了 Async/Await 也无法取得正确的值。

1
2
3
4
5
6
7
8
9
10
11
12
13
14
15
16
17
18
19
20
21
22
23
24
25
26
27
28
29
30
31
32
33
34
35
36
37
38
39
40
41
42
43
44
45
46
47
48
49
50
51
52
53
54
55
56
57
58
59
60
61
62
63
64
65
66
67
68
69
70
71
72
73
74
75
76
77
78
79
80
81
82
83
84
85
86
87
88
89
90
91
92
93
94
95
96
97
98
99
100
101
102
103
104
105
106
107
108
109
110
111
112
113
114
115
import React, { useState } from "react";
import ReactDOM from "react-dom";
import { Row, Col, Button, Collapse, Input } from "antd";

const { TextArea } = Input;
const { Panel } = Collapse;

class CounterA extends React.Component {
state = {
count: 0,
};

async incr(increment = 1) {
await this.setState({
count: this.state.count + increment,
});
}

async incrAndLog(increment = 1) {
await this.incr(increment);
this.props.log("Class API", this.state.count); // Here will log the new value
}

decr(decrement = 1) {
this.setState({
count: this.state.count - decrement,
});
}

render() {
return (
<Row style={{ width: 300, textAlign: "center" }}>
<Col span={24}>
<h3>{this.state.count}</h3>
</Col>
<Col span={8}>
<Button onClick={() => this.incr()}>INCR</Button>
</Col>
<Col span={8}>
<Button onClick={() => this.incrAndLog()}>INCR&LOG</Button>
</Col>
<Col span={8}>
<Button onClick={() => this.decr()}>DECR</Button>
</Col>
</Row>
);
}
}

function useCount(initCount = 0) {
const [count, setCount] = useState(initCount);

const incr = async () => await setCount(count + 1);
const decr = async () => await setCount(count - 1);

return {
count,
incr,
decr,
};
}

function CounterB({ log }) {
const { count, incr, decr } = useCount();

const incrAndLog = async (increment = 1) => {
await incr(increment);
log("Hooks API", count); // Here will log the previous value, WHY?
};

return (
<Row style={{ width: 300, textAlign: "center" }}>
<Col span={24}>
<h3>{count}</h3>
</Col>
<Col span={8}>
<Button onClick={() => incr()}>INCR</Button>
</Col>
<Col span={8}>
<Button onClick={() => incrAndLog()}>INCR&LOG</Button>
</Col>
<Col span={8}>
<Button onClick={() => decr()}>DECR</Button>
</Col>
</Row>
);
}

function App() {
const [logText, setLogText] = useState("[LOGGING HERE]");

const log = (domain, msg) => {
setLogText(logText + "\n" + `[${domain}] ${msg}`);
};

return (
<Row gutter={15}>
<Col span={12}>
<h4>DEMO</h4>
<Collapse defaultActiveKey={[1]}>
<Panel header="Counter with Class API" key={1}>
<CounterA log={log} />
</Panel>
<Panel header="Counter with Hooks API" key={2}>
<CounterB log={log} />
</Panel>
</Collapse>
</Col>
<Col span={12}>
<h4>Log</h4>
<TextArea rows={8} value={logText} />
</Col>
</Row>
);
}

是否感觉虽然 Hooks API 在使用时让代码看上去比较干净,但奇奇怪怪的心智成本增加了很多?是的,这一点我十分认同,Hooks API 引入了不少比较抽象且晦涩,导致其初期的学习曲线比较陡。

但不要害怕,让我来慢慢地讲讲如何基于 TypeScript 来帮助理解和学习函数式编程和 Hooks API 吧。

基于 TS 类型推导快速上手函数式编程

基本类型

首先,我们先认识两个基本的函数类型:

  • F<T>TF\relax{\lt}T\relax{\gt}\rightarrow T,函数 FF 的参数类型为 TT,该函数返回的值类型也为 TT
  • F<T>UF\relax{\lt}T\relax{\gt}\rightarrow U,函数 FF 的参数类型为 TT,该函数返回的值类型为 UU

简单地解释一下便是,第一种是函数的出参和入参为同一类型;而第二种则是函数的入参经过函数的执行后,出参的类型与入参不一致,可以理解为进行了一次映射。

类型推演

有了这两种基本类型以后,我们就可以开始对它们进行变形了。但在这之前我们来看看来自工业聚大大的两句话:

我不知道的数据,都是参数
我不知道的行为,都是参数

这两句话基本上涵盖了 90% 以上在 Web 开发语境中的函数式编程场景,那么我们便可以从以下一系列的函数变形中理解这两句话的含义。

  • F<T>TF\relax{\lt}T\relax{\gt}\rightarrow T
    • F<F<T>>F<T>F\relax{\lt}F\relax{\lt}T\relax{\gt}\relax{\gt}\rightarrow F\relax{\lt}T\relax{\gt},一个函数 F<T>F\relax{\lt}T\relax{\gt} 作为另外一个函数 FF 的入参类型,同时也是它的出参类型,参考示例: useCallback
  • F<T>UF\relax{\lt}T\relax{\gt}\rightarrow U
    • F<F<T>>TF\relax{\lt}F\relax{\lt}T\relax{\gt}\relax{\gt}\rightarrow T,与上面不一样的是,返回值是 F<T>F\relax{\lt}T\relax{\gt} 的参数 TT,参考示例:useMemo
    • F<F<T>>(F<T>,U)F\relax{\lt}F\relax{\lt}T\relax{\gt}\relax{\gt}\rightarrow (F\relax{\lt}T\relax{\gt}, U),传入一个函数 F<T>F\relax{\lt}T\relax{\gt} 返回值除了这个函数本身以外,还会返回一些其他状态UU,参考示例:useRequest
    • F<T>(T,F<T>)F\relax{\lt}T\relax{\gt}\rightarrow(T,F\relax{\lt}T\relax{\gt}),传入一个类型 TT,除了返回 TT 本身以外,还返回一个函数 F<T>(T,F<T>)F\relax{\lt}T\relax{\gt}\rightarrow(T,F\relax{\lt}T\relax{\gt}),参考示例:useState
    • ……

我不知道的数据,都是参数

这一句话很好理解,参考 JavaScript 开发社区中最流行的“瑞士军刀” Lodash,里面这么多的数据处理方法便可以看作是

F<T>UF\relax{\lt}T\relax{\gt}\rightarrow U

或者

F<T,F<T>U>UF\relax{\lt}T,F\relax{\lt}T\relax{\gt}\rightarrow U\relax{\gt}\rightarrow U

的体现。

函数中虽然我不知道我要处理的数据是什么,甚至连具体类型都是未知的,但需要执行的逻辑是确定的。

640.png

我不知道的行为,都是参数

在 Web 开发中,我们经常需要对业务逻辑中的一些自定义行为进行管控,比如:

  • 发送 Ajax 请求需要知道以下信息:useRequest
    • 该请求是否正在等待返回:加载中状态
    • 该请求是否成功返回:成功状态
    • 该请求是否需要手动触发:触发条件
    • 若该请求为自动触发,则触发条件有哪些:依赖刷新
    • 该请求是否需要被缓存:缓存条件、缓存状态
  • 有一系列涉及到异步操作的行为,为了降低系统的并发量,需要将它们自动进入队列并进行串行执行:runTrack
    • 在行为定义的地方希望能做到无感知
    • 执行方也不需要感知到队列的存在
  • ……

我们以第一个发送 Ajax 请求的场景作为例子,我们希望能有一个工具能够把实际的业务行为进行包装,并且包装过后的出参在使用方式上跟作为入参的行为是一致的。

1
2
3
4
5
6
7
8
9
const { run: fetchPosts, loading } = wrapRequest((authorId: number) =>
fetchPostsService(authorId)
);

fetchPosts(123);

// ...

const statusText = loading ? "Loading..." : "Done";

其实我们还有一种我们非常熟悉的“我不知道的行为”的场景,就是组件进行组合(Compose)和渲染(Render)的过程,接下来我们还需要引入另外一种概念 —— codata。

其实也没那么深奥的 PLT/数学概念-codata

不要害怕,codata 实际上并不是什么新鲜玩意。我们在学习小学数学中解方程的时候,就已经开始接触一个名为代数(Algebra)的概念了。什么?代数太抽象不好跟编程作类比?没关系,我们一步步来。
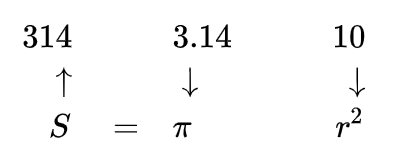
S=πr^2

还记得圆形的面积计算公式吗:

S=πr2S=\pi r^2

其中:

  • S 为圆的面积,也就是这条公式需要求的值;
  • π 为圆周率,作为一个常用无理数,它在不同的场景中会有不同的精度近似值,比如我们在学习的时候一般会使用 3.14 作为一个便于手算的近似值使用,而在对精度要求更高的场景中则可能需要用到小数点后 N 位;
    • 然而实际上我们应该把 π 看做圆周率计算算法在不同的近似精度下的结果
  • r 为圆的半径,而对于这条公式本身来说,r 也是一个未知数。

在这么简单的一条公式中,包括公式本身就已经存在了三个代数了。在数学中我们可以把未知数、算法看做是代数,代数本身没有特定的值,但我们却知道它们该如何使用。

640-1.png

有点抽象?没关系我们还是以 Web 开发的语境来举例子,假设有以下 PRD 需要进行实现:

640-2.png

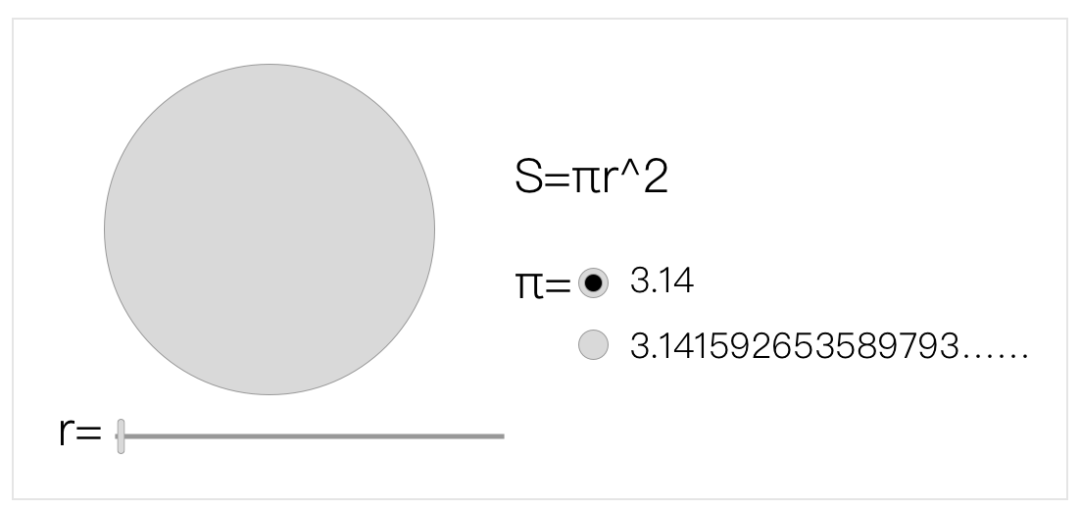
在这个 PRD 中,包含了以下几个元素:

  • 一个可以改变圆半径 r 的滑动条
  • 一个可以改变圆周率 π 所使用近似值的单选框
  • 一个根据所选半径以显示大小的圆形
  • 一个展示圆形面积的字符串

使用实际的 React Hooks 来实现 PRD 中的元素的话,需要定义下面的几个内容(伪代码):

1
2
3
4
5
6
7
8
9
10
11
12
13
14
15
import { useState, useMemo } from "react";

function App() {
const [r, setR] = useState(10);
const [PI, setPI] = useState(3.14);

const S = useMemo(() => PI * Math.pow(r, 2), [PI, r]);
const circleCSS = useMemo(
() => ({
width: r * 2,
height: r * 2,
}),
[r]
);
}

在这段代码中定义了四个实体,分别对应了上面需求中的四个元素,这四个元素已经可以满足 PRD 中所有的只读部分的开发了。但是在 PRD 中,圆的半径 r 和圆周率 π 这两个最重要的元素都是可以被改变的,所以在实际计算之前这四个元素的实际值都是未知的。只有当这个组件被实际渲染时,React 框架才会真正地从内存中读取当前由用户选定的、具有时效性的值进行计算。
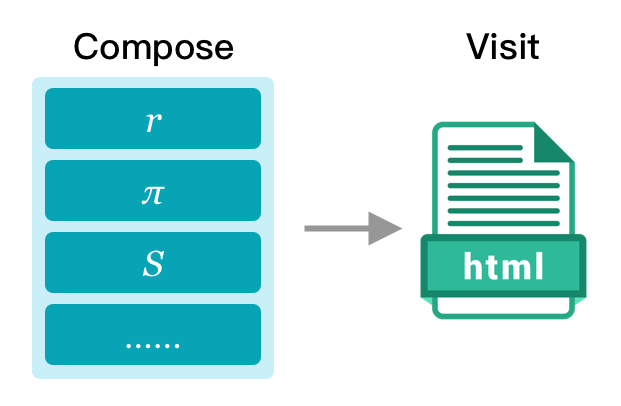
Compose & Visit

嗯,是否有些体感了?我们可以把 codata 的使用过程分为两个部分:组合(Compose)和观测(Visit)。假设说我们同样把这个函数组件以数学语言的方式表达出来,就可以是这样的形式:

Render=F<π,r,S,circleCSS<Render=F\relax{\lt}\pi,r,S,circleCSS\relax{\lt}

其中 S 和 circleCSS 又可以被改写成 F<π,r> 和 F,所以渲染函数就可以被写成以下形式:

Render=F<π,r,F<π,r>,F<r>>Render=F\relax{\lt}\pi,r,F\relax{\lt}\pi,r\relax{\gt},F\relax{\lt}r\relax{\gt}\relax{\gt}

这样看是不是感觉更加简单明了?这个渲染函数实际上是一个关于半径 r 和圆周率 π 且在 Web 开发领域中这个函数是可以分别对这两个元进行求偏导的。忘了什么是偏导?没关系,简单理解就是这两个元素的任意变动,所引起对整个组件整体所产生的变动都是可推测的。有没有回想起些什么?对,这也是 Redux 的理念。

我们在构建渲染函数:

Render=F<π,r,F<π,r>,F<r>>Render=F\relax{\lt}\pi,r,F\relax{\lt}\pi,r\relax{\gt},F\relax{\lt}r\relax{\gt}\relax{\gt}

的过程实际上就是一个组合的过程,在这个过程中每一个未知元实际上都不需要使用到它们的实际值,而仅仅是使用了他们的概念本身。
只有当函数被实际观测,也就是渲染的时候,里面的实际值才会被观测并用于计算每一层函数的值,最终得到渲染函数的实际结果。
在通过编写自定义 Hooks 的方式来复用逻辑时,实际上就是把这个自定义 Hooks 作为业务组件中的参数,这便是一个组合的过程。

useState<R>(R,setR<R>)useState<π>(π,setPI<π>)useMemo<R,π>SuseFoo<T>CRender<useState<R>,useState<π>,useMemo<R,π>S,useFoo<T>C>\begin{align*} &useState\relax{\lt}R\relax{\gt}\rightarrow(R,setR{\lt}R\relax{\gt}) \\ &useState\relax{\lt}\pi\relax{\gt}\rightarrow(\pi,setPI{\lt}\pi\relax{\gt}) \\ &useMemo\relax{\lt}R,\pi\relax{\gt}\rightarrow S \\ &useFoo\relax{\lt}T\relax{\gt}\rightarrow C \\ \\ &Render\relax{\lt} \\ &\quad useState\relax{\lt}R\relax{\gt}, \\ &\quad useState\relax{\lt}\pi\relax{\gt}, \\ &\quad useMemo\relax{\lt}R,\pi\relax{\gt}\rightarrow S, \\ &\quad useFoo\relax{\lt}T\relax{\gt}\rightarrow C \\ &\relax{\gt} \end{align*}

这样的好处是组件本身天然就是对惰性计算(Lazy Compute)更加地友好,对性能的调优也有了更大的空间。在 React Hooks 中,还提供了 useMemouseCallback 这些可以减少观测过程中的不必要计算的方法,对性能能做进一步的优化。

640-3.png

不过现实比较残酷,绝大部分组件都无法完美地改写成可导的函数,因为我们经常需要通过一些副作用(Side Effects)来实现我们更多的复杂需求,比如 React Hooks 中也提供了 useEffect 这样的方法。

让我们再次回到函数类型定义本身,渲染函数实际上也是 F→U 的一种变形,所以代表渲染的函数参数的类型 T 必须要在组合的过程中是确定的,才能得到确定的 U 也就是观测的结果——渲染的界面。从这个角度也可以解释为什么 Hooks API 不允许在逻辑分支中使用 Hooks API,同样也不允许在子函数中使用,这是因为这两种情况都有可能造成组合的过程中出现参数 T 不稳定的情况,所导致的结果便是结果类型 U 也不确定,不符合预期。要注意的是,这里所指的 并不特指某一个参数,而是整个参数组合。参数组合中的数量、顺序发生改变都代表这个 T 发生了变化,或者说不再是这个 T 。

当然 codata 还有相比于 Algebra 来说更多的特性,但在这里我们就不展开了,后续有可能会单独写一篇来详细讲讲这个熟悉又陌生的概念。

React Hooks 与 Vue Composition API

我们知道 Hooks API 在 React 率先发布以后,另外一个流行的 Web 框架 Vue 也公布了它的 3.0 版本。其中 Vue 3.0 与 2.x 最大的区别便是 3.0 版本中同样也引入了 Hooks API 的概念,并有着另外一个名字 —— Composition API。

相比于 React Hooks 的函数式组件,Vue Composition API 依然保留着 Vue 中独特的传统优势 —— Single File Component。相比于 React 中使用 JSX 作为视图层的表达方式,Vue 依然保留了更加原始且更易于管理的模板引擎。

1
2
3
4
5
6
7
8
9
10
11
12
13
14
15
16
17
18
19
20
21
22
23
24
25
26
27
28
29
30
31
32
33
34
35
36
37
38
import Vue from "vue";
import VueCompositionAPI, { ref } from "@vue/composition-api";
import Antd from "ant-design-vue";

Vue.use(VueCompositionAPI);
Vue.use(Antd);

const template = `
<a-row id="app">
<a-col :span="24">
<h3>{{count}}</h3>
</a-col>
<a-col :span="12">
<a-button @click="() => incr()">INCR</a-button>
</a-col>
<a-col :span="12">
<a-button @click="() => decr()">DECR</a-button>
</a-col>
</a-row>
`;

new Vue({
name: "App",

template,

setup(props) {
const count = ref(0);
const incr = (increment = 1) => (count.value += increment);
const decr = (decrement = 1) => (count.value -= decrement);

return {
count,
incr,
decr,
};
},
}).$mount("#app");

不难发现同样是组合和观测的过程,在 Vue Composition API 中是被分开成两个部分的分别对应 setup 方法和模板渲染(当然也可以是基于 JSX 的 render 函数),这相比于 React Hooks 来说更加贴近 codata 的概念。而且从实现原理上看,Vue Composition API 的 Compose 过程是只执行一次的与 React Hooks 的每次有任何参数发生变化都会重新执行组合相比更加利于管理,对性能来说也更加容易进行调优。

另外 Vue Composition API 在设计上也更加照顾原本使用 Vue 2.x API 的开发者,将 React Hooks 中 F<T>(T,F<T>)F\relax{\lt}T\relax{\gt}\rightarrow (T,F\relax{\lt}T\relax{\gt}) 的模型压缩为 F<T>Ref<T>)F\relax{\lt}T\relax{\gt}\rightarrow Ref\relax{\lt}T\relax{\gt})。将大部分复杂的心智成本由框架内部消化,大大降低了 Hooks API 的入门门槛。

Play together?

以至于现在竟然还出现了将两者融合起来的项目 antfu/reactivue,不失为一种好玩的思路。

1
2
3
4
5
6
7
8
9
10
11
12
13
14
15
16
17
18
19
20
21
22
23
24
25
26
27
28
29
30
31
32
import React from "react";
import { defineComponent, ref } from "reactivue";
import { Row, Col, Button } from "antd";

const Counter = defineComponent(
// Setup
() => {
const count = ref(0);
const incr = (increment = 1) => (count.value += increment);
const decr = (decrement = 1) => (count.value -= decrement);

return {
count,
incr,
decr,
};
},
// Render
({ count, incr, decr }: any) => (
<Row style={{ width: 150, textAlign: "center" }} className="App">
<Col span={24}>
<h3>{count}</h3>
</Col>
<Col span={12}>
<Button onClick={() => incr()}>INCR</Button>
</Col>
<Col span={12}>
<Button onClick={() => decr()}>DECR</Button>
</Col>
</Row>
)
);

最后

感谢您能花费这么长时间看一篇没有任何教程的文章,如果本文能够为你带来更多的新思路,重新思考 Hooks API 以及 React 应用的开发,就是本文最大的成就。

我们在学习一种新技术的时候,往往会先考虑是否要通过阅读其源码来进行“深入的学习”,但其实有的时候源码远远没有设计思想要重要,而 Hooks API 就是一个非常典型的例子。Hooks 的实现方式事实上十分取巧,导致如果只从源码角度来学习 Hooks 的话,只会导致久久无法越过 Hooks 最初的学习陡坡,而逐渐丧失对其的兴趣。

余之拙见,且望指教。

CC-BY-SA-3.0
Author: wen